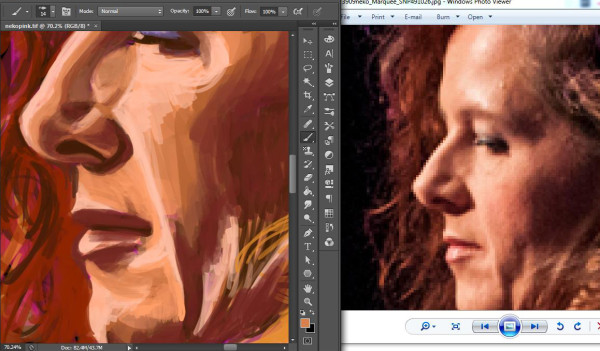
Welcome back to my three-part tutorial on digital portraiture, using my most recent Neko Case piece. For those just joining, here’s some links to catch you up:
– Part 1
– Part 2
– Timelapse Video
Now onto Part 3, the fun part where we actually start painting!
Starting the Portrait
I have found it useful to draw on a separate layer from the background layer when I do digital art. This frees me up to change the background color and texture later at my convenience without having to paint around the subject. I’ll usually do a basic color ‘wash’ with the fan brush on the background layer and then start sketching on a new layer.

In the Wet Media presets I use a round brush for my initial sketching out of the picture. To save time later, I use line colors that match the colors of the reference instead of just standard black.
Once I have done an initial sketch I begin filling in areas of color with the fan brush– just basic blobs of shape to start.

Color mixing in digital work can be done optically (by placing colors next to each other and letting the eye ‘blend’ them) or by using the brush’s natural transparency (turning on Buildup in the brush settings will enhance this and make it more like airbrush, watercolor, or ink washes). This second technique is akin to alla prima, or ‘mixing on the canvas’.

As far as picking which color to use, you obviously can’t mix them on a palette and need to just pick them directly. I pick my colors via the aptly named Color Picker tool in Hue/Saturation/Brightness (HSB) mode, and as I work I’ll use the Eyedropper tool to sample colors already in my painting and tweak them with HSB as needed.

Continuing the Portrait
If you are already a portrait artist you already have general techniques that most likely will apply here. Artists work very differently when they draw. For example, some people like to finish a section before moving on. I like to work more generally, developing everything together, to make sure the proportion stays accurate. This is because I draw freehand; many artists use a grid technique to maintain proportion.
Because everyone has their own techniques for portrait drawing, I will just list out some tips that I’ve picked up or discovered, especially while figuring out how to do this digitally:

1. Use more saturated colors to start as sort of an undercolor. It’s better to start bright and saturated; you can always tone colors down with shading later.
2. Round brush is best for small details and lines, while fan is best for shading and large color areas.
3. Whites are rarely just ‘white’. For example, eye whites do better with a touch of blue in them; teeth a touch of yellow.
4. It’s best to draw dark areas first and then highlights on top. Especially for hair; everyone always asks me how I do hair (the answer is carefully and intricately). Hair gets its look by the way the light hits it, meaning what you’re usually seeing and therefore painting is a mass of darker color with lighter individual strands on top.

5. When in doubt, measure. With faces, one little thing can throw the likeness off, and oftentimes it’s not obvious what that little thing is. So measure often. That’s actually my number one piece of advice about portraiture.
6. Speaking of proportion: the only (one weird) Photoshop ‘trick’ I use is if I have developed something to my liking but the proportion is slightly off. I’ll Lasso tool the part that’s off and nudge it a bit with the Move tool until it looks right. That’s a quick technique for moving parts of a picture around.

7. Only use black in the darkest parts. Even in traditional mediums painters rarely use black, even to darken existing colors. Instead, they often mix some of the complementary color in to make the colors appear darker without desaturating them too much. Black by itself is as dark as you can get so you don’t want to overuse it. Although the way to darken a color digitally is to add black (by decreasing brightness), sometimes increasing the saturation while you decrease the brightness can help keep your color from getting too gray.
8. Textures like stubble and fabric may require different brushes, like a stipple-type brush. You can also use the tip of the fan brush for a stipple effect.


9. Highlights usually go on last thing. You can use pure white for the brightest parts. Like the black, don’t overuse white.
10. Chiaroscuro is super important in portraiture, especially for tricky parts like noses where you don’t have a lot of contour to guide you. Getting the right mix of highlight and shadow will sculpt these areas.

That’s about all I can think of to talk about in regards to digital portraiture. If you have any questions about it, or traditional portraiture, leave a comment below!


Leave a Reply