
7 Ways You Can Help Your Artist Friends

One of the things I’ve noticed since becoming a full-time freelance artist is not only how different the workflow and general vibe can be compared to a 9-5 job… but also how the job is perceived from the outside. You probably hear a lot about how potential customers can devalue artistic work as opposed to, say, dentistry or the tech industry or one of those ‘actual’ jobs. There’s the idea, too, that art is somehow ‘magic’ or that we are tapped into a supernatural source from which we derive our talent or creativity. But I think what a lot of people really do not understand is just what to DO with a friend who’s decided to
(gasp!) Go To The Art Side. I used to feel all alone and misunderstood until it dawned on me (with help from amazing artists like Amanda Palmer) that people really DO want to help.
They just aren’t sure HOW.
Lately people are telling me this outright– that they wish they could help me more with my art career but they don’t have money, or don’t ‘know anybody’, etc. etc. This blog is for all of you people, because there are actually many surprising ways you can help me out (or any artist you love, really) that require little or no effort/connections/money on your part.

1. Share, share, share.
The number one way to really help an up-and-comer of any new business, art or otherwise, is to make them known! Get the word out there about my work. Share your favorite piece with your friends and link back to my page or site! When I have an important announcement about an upcoming show or a sale, consider sharing that too! Artists can’t get anywhere without building an audience, and one of the ways to do that is through word of mouth. The best thing about it is that it’s free for everyone!

2. Get connected with me!
That way you can not only know what I’m up to, but also what I can do for you. Sometimes I also might need specific help with something and then I’ll ask my audience for ideas. It could be anything from “Does my profile pic make my butt look big?” to “Anyone know how to get acrylic paint off a cat other than a close shave?”
There are lots of different ways to keep track online, such as signing up for my mailing list, liking my Facebook page, and/or following me on my other social media sites (listed below).
- Tumblr
- Google+
- DeviantArt
- DesignbyHumans
- Society6
- Redbubble
- FineArtAmerica
- Artfire
- Etsy
- Youtube
- Patreon
- Mailing List Sign-up
Offline, you can come to one of my shows or events! And by the way, if you see an artist at a show or gallery that you’re really into, for the love of all that is arty, TAKE THEIR BUSINESS CARD. Think of it this way: they’ve gone to the trouble of paying for the printing and shipping (and sometimes the design) of these things so you might as well partake and make them feel a little bit of love. If you don’t see one, ask for one. They will usually at least scribble down some contact information for you.
A lot of artists also have paper signups for e-mail lists. Don’t worry about spam– I have never been spammed by one of these and I sign up for tons. These things are usually monthly or even less frequent because we artists are generally very busy doing art, not e-mailing! And using an all-purpose Gmail address to sign up for things is a good way of insuring next-to-no-spam in general.

3. Give me feedback.
This is always super important in the art world, or even just for anyone striking out on their own. We don’t have bosses telling us what to do– our audience is our only form of outside feedback.
What is feedback? It can be as simple as letting me know what you think of my pieces. Here are some sample questions to give you an idea:
- Would you buy one?
- What would make you want to buy one?
- What would you like to see as far as products or subject matter?
- Is there anything that has stopped you from buying something of mine?
- If you have bought something of mine, is there something about the process or result you did not like or think I could do better?
If you don’t feel like playing art critic, even just going through my website or taking a look at my social media feeds and seeing if they make sense to you, if things load right, if links are broken, if I said something stupid or offensive, or if things look abominably complicated or ugly… this is all extremely helpful to me. I want to make sure that what I think I’m saying, other people can actually hear. And anyone, artist or not, can let me know what they’re hearing and how I might improve my message.

4. Ask me questions!
Another form of feedback, really, because it lets me know what is still unclear or what might be interesting to explore in the future. I base a lot of my blog posts on questions I receive or conversations I have with others. Beyond that though, it again lets me know if I need to strengthen what I’m saying in parts. Maybe I think what I’m babbling makes sense and it doesn’t! Or maybe there’s some weird conception out there about what I do that needs tweaking. The greatest thing about questions is that it lets me know who’s out there and paying attention, and what they Want To Know.

5. Help me look for places to sell.
I am always scouting for possible venues for my artwork, which can include galleries, cafes, shops, fairs, marketplace pop-ups, and so on. You may know of a cool place that always has art on the walls, or maybe even looks like it’s in need of it. You may hear offhand of festivals that most likely will call for vendors. There may be some cool website you think I may want to check out for social media or sales purposes. Let me know! I used to be kinda ‘meh’ about suggestions like this, but then I grew up and realized that not only did people mean well, but they had some pretty useful advice. So even if you think I’ve heard of it, just assume maybe I haven’t! Also, don’t assume you’re too far away. Shipping is something I’ll consider if the venue seems cool enough and the terms make sense!

6. Introduce me!
Everyone knows someone, even if they don’t think it’s a super important connection. Often things that don’t seem art-related are! You may know someone who works in a cafe or shop, for instance, or whose company participates in Art Walk activities and who would be willing to hang my art or sell for consignment. Or you may know someone who has been looking for a new logo design for their company, banner for their website, photographer for their event, portrait artist for their family, gift for their loved ones… the possibilities really are endless. I’m betting you probably know a couple of other artists, which believe it or not is a very helpful connection for sharing information, collaboration, and even just moral support from a fellow in the struggle. And sometimes even jobs! I got one of my very first commissions because I just happened to be sitting next to a fellow designer who had too much work on her plate at the moment.

7. BUY SOMETHIN’ WILL YA.
Of course buying from me is a great means of support, if you can. There are a lot of different ways to do this, too.
Fine Art and Products
I sell in several shops (see my list of social media above) and also do some local art shows and galleries. Art makes great gifts, especially if you do buy from one of the print-on-demand sites like Society6 because they will print on many different types of products including clothing, coffee cups, and even throw pillows and blankets these days!
Commission Work
I take commissions and heavily encourage you to hit me up for some if you are looking for special, one-of-a-kind items and gifts. I do portraiture and design commissions as well as event photography, and at the moment have extremely reasonable rates for all three. (See my pricing info here) Sometimes the photography and the portraiture can overlap– if you have a personal photo with some flaw in it, or you want to make some aesthetic changes, then I can repaint it to your liking.
Crowdfunding
I have a Patreon page where you can contribute as little as one (1!) dollar a piece. This is great for people who just want to help keep me going without a tremendous amount of effort. The money does add up, it makes you part of a special circle of fans, and it is a major encouragement to me and other artists. It tells us our work really is valuable and that people want to see it. There are even special treats for each tier of donations– super cool if you’re like me and love behind the scenes info.

Overwhelmed? Inspired? Know that just by reading this blog you have helped me out already. Now go share it with fifty of your closest friends!
All images in this post were taken as part of a photography project in 2012 called “Flying Solo”.
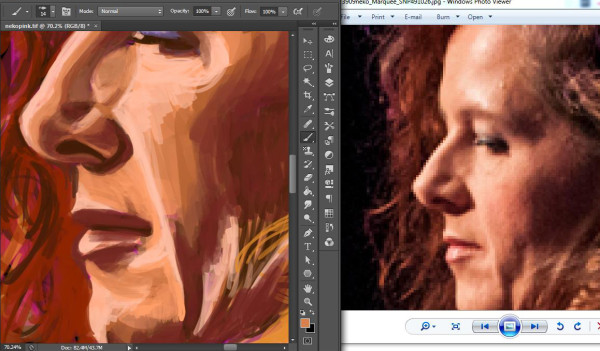
Digital Portraiture, or How I Painted Neko Case Pt. 3

Neko Case, Austin City Limits 2014, reference provided by Scott Newton.
Welcome back to my three-part tutorial on digital portraiture, using my most recent Neko Case piece. For those just joining, here’s some links to catch you up:
– Part 1
– Part 2
– Timelapse Video
Now onto Part 3, the fun part where we actually start painting!
Starting the Portrait
I have found it useful to draw on a separate layer from the background layer when I do digital art. This frees me up to change the background color and texture later at my convenience without having to paint around the subject. I’ll usually do a basic color ‘wash’ with the fan brush on the background layer and then start sketching on a new layer.

In the Wet Media presets I use a round brush for my initial sketching out of the picture. To save time later, I use line colors that match the colors of the reference instead of just standard black.
Once I have done an initial sketch I begin filling in areas of color with the fan brush– just basic blobs of shape to start.

Color mixing in digital work can be done optically (by placing colors next to each other and letting the eye ‘blend’ them) or by using the brush’s natural transparency (turning on Buildup in the brush settings will enhance this and make it more like airbrush, watercolor, or ink washes). This second technique is akin to alla prima, or ‘mixing on the canvas’.

As far as picking which color to use, you obviously can’t mix them on a palette and need to just pick them directly. I pick my colors via the aptly named Color Picker tool in Hue/Saturation/Brightness (HSB) mode, and as I work I’ll use the Eyedropper tool to sample colors already in my painting and tweak them with HSB as needed.

Continuing the Portrait
If you are already a portrait artist you already have general techniques that most likely will apply here. Artists work very differently when they draw. For example, some people like to finish a section before moving on. I like to work more generally, developing everything together, to make sure the proportion stays accurate. This is because I draw freehand; many artists use a grid technique to maintain proportion.
Because everyone has their own techniques for portrait drawing, I will just list out some tips that I’ve picked up or discovered, especially while figuring out how to do this digitally:

1. Use more saturated colors to start as sort of an undercolor. It’s better to start bright and saturated; you can always tone colors down with shading later.
2. Round brush is best for small details and lines, while fan is best for shading and large color areas.
3. Whites are rarely just ‘white’. For example, eye whites do better with a touch of blue in them; teeth a touch of yellow.
4. It’s best to draw dark areas first and then highlights on top. Especially for hair; everyone always asks me how I do hair (the answer is carefully and intricately). Hair gets its look by the way the light hits it, meaning what you’re usually seeing and therefore painting is a mass of darker color with lighter individual strands on top.

5. When in doubt, measure. With faces, one little thing can throw the likeness off, and oftentimes it’s not obvious what that little thing is. So measure often. That’s actually my number one piece of advice about portraiture.
6. Speaking of proportion: the only (one weird) Photoshop ‘trick’ I use is if I have developed something to my liking but the proportion is slightly off. I’ll Lasso tool the part that’s off and nudge it a bit with the Move tool until it looks right. That’s a quick technique for moving parts of a picture around.

7. Only use black in the darkest parts. Even in traditional mediums painters rarely use black, even to darken existing colors. Instead, they often mix some of the complementary color in to make the colors appear darker without desaturating them too much. Black by itself is as dark as you can get so you don’t want to overuse it. Although the way to darken a color digitally is to add black (by decreasing brightness), sometimes increasing the saturation while you decrease the brightness can help keep your color from getting too gray.
8. Textures like stubble and fabric may require different brushes, like a stipple-type brush. You can also use the tip of the fan brush for a stipple effect.


9. Highlights usually go on last thing. You can use pure white for the brightest parts. Like the black, don’t overuse white.
10. Chiaroscuro is super important in portraiture, especially for tricky parts like noses where you don’t have a lot of contour to guide you. Getting the right mix of highlight and shadow will sculpt these areas.
That’s about all I can think of to talk about in regards to digital portraiture. If you have any questions about it, or traditional portraiture, leave a comment below!
Digital Portraiture, or How I Painted Neko Case Pt. 2
Neko Case, Austin City Limits 2014, reference provided by Scott Newton.
Welcome back to my three-part tutorial on digital portraiture, using my most recent Neko Case piece. For those just joining, here’s some links to catch you up:
– Part 1
– Timelapse Video
Now onto Part 2 where I discuss the preparation I go through, including reference photos and settings. While these steps might seem tedious, they’re super-important to save a lot of frustration later on.
No, really. You will.
Picking a Subject
When I was learning how to draw I exclusively used photo references. I was later told that the only way to really draw something well is to draw it while it’s in front of you, like a portrait sitting or still life. I disagree with this; to me they’re two different methods, each with their own pros and cons. A lot of time it just comes down to necessity. I obviously wasn’t able to get Neko Case to sit down for a portrait so I had to draw from a picture. But which picture?
Obviously we should pick a composition that appeals to us, or cobble something together from several different pictures to create our own. Another criterion is quality; we can certainly draw from a crappy, out-of-focus, low-res photo but we’ll get better results the more details we have to work with.
I specifically wanted to do a picture of Neko that wasn’t promotional, because I wanted her to look real. For concerts she doesn’t get all made up and actually looks the age she is today, which is amazing and inspirational in this day and age. She’s a musician, not a model. I picked this concert photo by Scott Newton because I really liked the colors and composition, and Neko looks pretty badass in it.

Photo by Scott Newton.
Document Settings
If you want to be able to make prints of your work later, it’s important to choose the right settings when creating your file. Making sure that your picture will be large enough, that the
I set my resolution to at least 300 ppi and my size to 16 x 20 inches.
Saving the file as a psd or tif with layers and no compression are good options for preserving all the details in your picture without pixelization. Later you can save as a jpg to share on the web or upload to a print service. Consider your psd or tif the ‘original’.

Karen Gillan as Amy Pond from Doctor Who. Reference courtesy of BBC.
Brush Settings
I’ve mentioned there are many brush options out there, but in Photoshop I tend to stick to the Wet Media preset because they are closest to traditional brushes. Opening the Brush panel allows you to tweak each brush in a preset, or create your own brushes and presets.
My preferred options for each brush are as follows:
- Set spacing to 1% (otherwise I find the edges of the lines appear too jagged)
- Turn smoothing on (helps with the jaggedness)
- Turn transfer on, and in its options:
- Set opacity control to pen pressure (similar to the buildup option, this lets you make a darker mark or lighter mark depending on how hard you press down)
- Turn jitter off
- Turn shape dynamics on, with these options:
- Set angle control to pen tilt (the angle at which you hold the tablet pen will determine the shape of the brush, so you can do stuff like make a dot with the tip or create lines with the pen held more horizontally)
- Turn jitter off
Be sure once you are done you save them as new brushes; I still can’t figure out how else to get Photoshop to save my preferred settings.

Fiona, one of my kitties. Reference photo by April Burton/Ansate Jones.
Tablet Settings
You can reconfigure every button on your tablet and pen if you really want to. I do the following minimal things to streamline my process:
- Make sure that in Photoshop settings you have the tablet scroll wheel set to zoom; you have to do this in your tablet settings and in Photoshop for whatever reason.
- Make sure any ‘touch’ option is off, meaning just the pen will activate the drawing area. Now you can rest your hand on the tablet while drawing without worrying about interference with controls.
- I keep the buttons on my right hand side because I draw with the left. Sometimes the tablet will see this as ‘upside-down’ and the cursor will go ‘backwards’. If this happens you need to go into your tablet driver settings to ‘flip’ the layout.
Once you have your free hand working the tablet buttons you can utilize shortcuts as you would on a keyboard. For example, you can hold down the pan/scroll button on the Intuos 5 tablet while dragging on the drawing surface. It turns the cursor into the hand tool in Photoshop so you can move around the picture as you work on it without having to zoom in and out or use the scroll bars.
That’s it for prep work! Join me next time for Part 3 where I finally get to the fun part: drawing!
Digital Portraiture, or How I Painted Neko Case Pt. 1
Neko Case, Austin City Limits 2014, reference provided by Scott Newton.
So it’s twice now my digital drawing has been referred to as ‘like magic’ by onlookers. Recently I uploaded this video
to Youtube showing a timelapse of me digital painting Neko Case and got a few good questions about it (plus one of the aforementioned ‘magic’ comments!). It kind of reminded me that a lot of people probably don’t really know what ‘digital portraiture’ really is. While drawing skills take time to develop, and portrait drawing can be a special subset of that which requires even more practice, I thought I’d at least try to demystify some of the process by sharing how I do what I do. This ended up being pretty long so I’m dividing it into parts. This first part is a general overview of digital painting and equipment used.
Traditional vs. Digital
Traditional drawing and painting has long been seen as ‘better’ than digital tablet drawing. While I can understand that, I think it’s a little unfair. It’s true that with digital drawing you don’t have to tussle with the medium itself; I have a hard time wrangling actual paint and brushes, but Photoshop’s brushes always act the same because I’ve programmed them, and I can select exactly the color, hue, shade, tone, etc. that I want to use. If I make a mistake, I can just erase what I did by using the Undo and History options, or even just literally remove the line I made, without a trace, with the Eraser. So at first blush it would seem like digital art is super simple in comparison to traditional mediums.

Jeremy Renner as Hawkeye in Thor. Reference provided by Marvel.
But it’s not so simple. Tablet drawing is a whole new medium in its own right and at first it can stump a lot of traditional artists. When you draw or paint something, typically you are looking at the subject and not at what you’re drawing– this is the ideal method, but not everyone follows this. You can’t look down at what you’re drawing with a tablet; there is nothing there. They’re coming out with new screens you can directly draw on which circumvent this, although I don’t know how well they work yet.
Even if you are used to looking at the subject while drawing, there is still a disconnect between what you are drawing and what’s on the screen and it takes a little bit of time to get your hand and eye re-coordinated. In essence tablets add an extra ‘surface’ or plane of view to the equation: rather than just having the subject and the drawing, you have the subject, the drawing surface, and the drawing that appears on your screen. This is one of the hardest things I faced when beginning to use my tablet.

Joshua Jackson as Peter Bishop in Fringe. Reference provided by FOX.
Digital brushes also can give artists a bit of trouble, which is why I’ve taken the time to go over what settings I generally use. Photoshop comes with some very nice traditional wet media brushes, and artists are always suggesting and creating new brushes. There are many more options than just the default ‘airbrush’ rounds, and you can find some to start with by opening up the brush window and looking at the various presets. Then you can fine tune each brush with more settings, which I’ll get into in a bit.
Finally, about 90% of what I do is utilize traditional techniques, with just some tweaking to compensate for the digital medium. When you’re tablet painting or drawing, you are in essence still painting or drawing; the only thing that really changes is what equipment and materials you are using. Most of the rules about perspective, proportion, composition, and color theory still apply.

Thom Yorke, Glastonbury 2011. Reference photographer unknown.
A Word About Equipment
It’s worth noting that depending on your tablet model, you can do different things. Later when I talk about the brush settings, for example, I mention ‘pen tilt’. Tilt sensitivity is a thing not all tablets feature. The size of the tablet drawing surface can also vary dramatically. I am currently using a Wacom Intuos 5 Touch size large, which gives me a drawing area around that of a legal-sized piece of paper.
There are a bunch of drawing programs out there, some of which are free like GIMP. Nowadays I use Photoshop to do my portraiture and the settings I mention may vary or not be available in other drawing programs.

Tori Amos, American Doll Posse Tour. Reference photographer unknown.
Freehand– Not Tracing
Finally, I just want to make it clear that I draw freehand using photos as a reference only. I know there are some digital artists who merely draw over top of a photograph in Photoshop, or apply filters to make their photographs appear ‘painterly’. That is not what I do.
That’s the overview of digital portraiture. Stay tuned for part 2 where I talk about picking a suitable reference photo as well as the settings I use on my tablet, document, and brush!
Bad Design Made Better #1 – Candy Baron

For the past few years I’ve gotten into collecting advertising materials. Mostly business cards, but also flyers, menus, brochures, single page ads– anything that reflected some degree of design put into the process. The reason is simple when you think about it: I’m a graphic designer as well as a traditional artist, and seeing what other people are doing and learning from it is part of the game. You have to stay current.
Unfortunately most of the design I run across is… well, at best it’s just flawed in a few ways, but at its worst it makes my eyes bleed. I know there are a lot of sites that poke at bad design. In this ongoing blog series I intend to go a step beyond that, and actually attempt to FIX the design issues I find. It’s a good exercise for any designer, and in some instances can even serve as a portfolio builder. If you’re careful enough to say, like, twelve billion times over in your portfolio that you were not actually hired to do this and it is just a sample of what you’re capable of doing for your future clients.
A big part of this, though, is that I just have the urge to fix things, even if I’m not getting paid to do it. Ever have that?
My first attempt, then: Candy Baron’s business card.
Candy Baron is a cool candy shop in Monterey and I had the pleasure of visiting it a very long time ago. I’m not sure if they have changed their business cards by now (probably) but back in the day it looked like this:

Uh… huh. Let’s ask ourselves the first, most important question: Does this even look like a candy store’s card? It’s a beautiful picture, but when I first picked up this card I have to tell you I was baffled. WTF did a cypress tree and a sunset have to do with candy? How were people going to remember this place based on the imagery of this card? Furthermore why waste double-sided card printing– which, yeah, is an extra cost– to simply put the SAME image on the other side, only this time in much less appealing black-and-white?
The image obviously has to go. That’s a no-brainer. Pretty as it is, it doesn’t tell us anything except, “Hey, we picked a gorgeous place to set up shop, go us!” I’m envying them, yes, but it’s not making me want candy.
To get some ideas of what Candy Baron is all about, first thing I did is visit their website. It looks way different from the business card– another problem. You want all your promotional material to match at least somewhat, or else it’s just going to confuse people trying to find you. I would never take a quick glance at this card and realize it was for the same business that has this as their website header:
Looking at this header… it’s good. And nothing like the business card. It has that old-time candyman feel to it that I think they were going for in the store– stripes, nice bright color, kind of carousel-like font. It really makes me think (or hope, anyway) that in the past few years they must’ve gotten a new design. Still, all I have to go on for a business card is this old thing, so I might as well make it match now. The point of this is to practice, after all.
First off, promo materials really look better with some sort of logo to tie everything together and differentiate the product. I was worried I was going to have to create a whole new logo for this place, which I really didn’t want to do, and it looks like I don’t have to because they have their little ‘baron’ character. So I popped him into Illustrator and traced him out. He’s a bit complicated for a small item like a business card (all that detail will be lost when you size down), and logos tend to be more streamlined these days anyway, so I took the liberty of simplifying the design just a tad, as you’ll see. I also added stylized parentheticals around him to suggest the shape of a barrel, since there was one in the header design. It just ends up encapsulating the logo and setting it apart a little better in my opinion.
Ok, logo gotten. Now on to the card layout itself. Let’s take a look at the text in the original again:
So now we have our second most important question: Can I take a quick glance at this card and get all the necessary info out quickly and efficiently? Again, not really. All the info is squeezed together with no real hierarchy of importance. That’s something you absolutely need for a business card, because nobody sits there and reads and studies something like that. They glance at it. So in order to design a good one you need to make sure that all your information is lumped together appropriately. It’s a principle designers call ‘proximity’ and you can read more about it in this article by Louis Lazaris.
In the original card design, the first four lines (and again in the last line) are the address and phone number (the phone number is even in there twice, for whatever reason). These would be one proximity lumping, and traditionally they’re put at the bottom of the card. The next three lines from the top are basically bullet points highlighting why their store is special. Then comes the name of the store itself, smack in the middle of the card. Finally, at the bottom, the strangely quotated “We Ship Everywhere!” (is this their slogan?) and the aforementioned repeat phone number. On the back, all it says is “Thanks for visiting / Hope to see you soon!” Again, a waste of a double-sided print in my opinion. If there was a coupon or one of those punch card things, that could be worth the cost.
The card font itself does not excite me, and again doesn’t tie into the fantastical font they use for their site header. Again, it’s like it’s for a totally different business. You really don’t want that.
Taking all this into consideration, I put this together:

So, what did I change? I went with a simple white and aqua color scheme, in keeping with the website header. The stripes are influenced from the awning in that header, though if I were truly printing this out I’d want to make sure the trim margins allowed for it. I stuck the baron-in-a-barrel logo over on the right almost as a curio portrait, in keeping with the old-timey feel. And I chose a font for the store name* that approximated the website header’s. If I had been hired to do this, of course, I would have put more effort into the font selection and perhaps even created my own. Since this is just a sample demonstration, I admittedly cut some corners. And kerned the hell out of this font to make it work.
I gave bullets to the bullet points, after some deliberation. Again, if this was a paying job I would have put more effort into the candy shape designs. As it is I just wanted to give an idea for the vast number of possibilities here. Note I changed the text slightly to give it a bit of personalization: “Your old-time favorites”.
The address and phone number took their traditional places near the bottom of the card. And the odd quote, We Ship Everywhere, becomes We Ship Anywhere and gets tucked neatly under the curio. Almost as if the Baron himself is saying it.
Since I couldn’t think of any other information to add, we don’t need a second side. And since we’re not printing full color photo resolution, that’s more money potentially saved for my imaginary clients. Won’t they be so happy!
What do you think? Did I save this card design or ruin it? Let me know in the comments below.
*As a side note, whether the store is called Candy Baron or The Candy Baron seems to depend on who you ask (or, more accurately, what piece of advertising you consult). Since the site itself uses the word ‘the’, I used that on the card. Again, consistency in these things is key. Even on the small stuff.
8 Ways to Make Your Travel Photos Not Suck


1. Go For a Non-busy Background

One thing you probably don’t want to end up in your vacation memories: random background creeper! (From Awkward Family Photos)
This counts for just about any photo but in travel pics a busy background can be an especial nightmare. Now, by ‘busy’ I don’t mean a crowded street market or a teeming school of fish. In those cases the business and confusion is what you want to capture. No, what I mean is taking a picture of your preteen daughter and accidentally including two giraffes mating in the background.

Aw, that’s adorable. You actually thought I was kidding. (From Awkward Family Photos)
Or trying to create the feeling of a wild, romantic landscape… but you can totally see an icky trainyard behind the happy campers.

And they were never seen again. (From Awkward Family Photos)
Background is always important, and can make or break a picture. It’s much better to pick a more neutral one that lets you focus on the subject, or to blur out the background with low aperture, a zoom lens, or simply getting closer to who or what you’re shooting.

A prime lens is perfect for blurring unwanted backgrounds because its f-stop is so low.
2. Use Soft Side Lighting Where You Can

Not grumpy, just squinty! (From Dain Bread)
When you’re taking pictures on the fly, sometimes it’s hard to remember the position of the sun or other light sources. Our eyes can adjust to light much more effectively than a camera lens, meaning that taking pictures in full sunlight can result in washed out images. It gets worse when, as inevitably happens, you want to take your fellow travelers’ portraits. Squinting, shadows under the eyes, washed out skin… all of this happens when the lighting sucks and none of this is 100% fixable in Photoshop. It makes your subjects look like they’re having no fun– which surely they can’t be while staring into the sun waiting for you to get the perfect shot.

He was having a good time, really. I swear.
Side lighting usually has the advantage of being softer, more diffuse, and extremely flattering to faces. Try to position your subjects so that the light hits them from the side or indirectly. You can also use shade.

(L) Side lighting tends to bring out the most pleasing and dynamic angles in the human face, which is why it’s used so often for modeling. (R) If you’re looking for filtered light, position your subject under a tree. Just be careful the light and shadow isn’t too dappled!
3. Choose Interesting Angles

(Photo by Bjarke Christensen Røjle)
Travel photography is, at its heart, documentary. We take pictures to chronicle our trips and experiences. That’s why it’s so tempting to quickly snap a photo of everything that catches our interest without stopping to think whether it’ll actually make a good picture. We treat our cameras almost like scanners. I’ve even seen people taking pictures of commemorative plaques and signs: nothing more than text. There’s nothing wrong with this, but if you’re going to put this photo in your Flickr stream, why not make it look good? Think about what interests you in a particular subject and try to capture that in the picture.

A somewhat boring shot, but you can see that it’s one the other tourists seem to gravitate toward!
Tons of skulls in a crypt? Try taking a picture from the end of a long row of them to give that feeling of infinity.

A more dynamic angle can add visual interest and create a different feel.
Statue of an imposing figure? Why not take that picture from the base to make it look even taller and more imposing? Even pictures of signs or flat museum displays can benefit from a little dynamic angling.

The same museum display looks flat when photographed straight-on, but viewing it at an angle makes you appreciate its dimensionality and purpose.
4. Encourage Candid Behavior or Unique Posing

This is what happens when you let strangers take your photo. (from Darren Alff)
One of the most common ‘boring travel photo’ tropes is seeing shot after shot of someone standing stock still near a statue, building, or sign with a cheesy smile on their face. After a while this not only gets repetitive but awkward since they’re always staring right into the camera and so obviously posed.

I don’t care if you’re being eaten by a shark or not. You’re not spoiling THIS family photo, Timmy! (From Awkward Family Photos)
Why not try for a more natural shot? Try having your friends or family members interact with the environment in some way so that it doesn’t just look like a photo opportunity but an actual memory.

This quickly became our quintessential ‘traveling through the UK’ image. We took a lot of trains, okay?
Even if it’s silly, it’ll be something unique you’ll look back on and smile about. Although the whole ‘holding up the Leaning Tower of Pisa’ gag may seem old, it’s still way better than just someone standing there blocking the scenery.

I still don’t get how this ended up on Awkward Family Photos. It’s adorable and creative!
The ABC’s of improving your photographic technique
ABC’s are a way overdone format for how-to articles, I know. It kind of happened by accident when I was writing up some photo tips and realized that the three most important elements of basic photography could be boiled down to:A: Available Light
B: Background
C: Composition
If it sounds too easy, it kind of is. What I’m about to share with you are very basic principles that will end up being a lifesaver in your photography. And if it sounds too hard, don’t worry. I’ll go into more detail than you could ever want in later posts. For now let’s start with:A: Available Light
If we’re going to start anywhere it’s with light, the single most important thing to consider when taking a picture. Don’t believe me? Look at the etymology. Photography literally translates to ‘drawing with light’. Even with our digital camera technology, we still require lightwaves reflecting off the subject and striking the sensors to take a picture.
Right, enough sciency talk. Let’s talk about quality and amount of light. ‘Quality’ means what temperature the light is, how harsh or soft it is, even what angle it’s coming in at to hit your subject. Here’s some things to keep in mind:
Time of day
The sun, of course, is an excellent source of light but the darn thing has a tendency to move throughout the course of a day. And of course, then it disappears for 8-12 hours (unless you’re up near the poles). Because of this, the angle of light changes and thus the quality.
Have you ever taken a picture at high noon in a desert? Notice how washed out and colorless everything looks? How dark the shadows are? Full, unobscured sun is one of the hardest light sources to wrangle simply because it is so strong and so direct. It’s even worse if you’re trying to take portraits because when the light is overhead, people’s eye sockets are excellent at collecting horrible shadows that turn your subjects into deformed monsters. But hey, Halloween is coming up…

Something as simple as moving into the shade can 'save face' for the photographer during a family portrait (I'm so sorry)
As the sun rises and sets the light tends to strike objects from the side and is also softer and warmer (meaning, redder). This is the kind of light you want, and if you take pictures at sunset and sunrise you just might catch what’s called ‘the magic hour’– basically where everything looks like it’s on fire. This is like the holy grail of time for photographers.

Believe it or not, these pictures were taken within two hours of each other.
Weather
Because it’s just so dang bright, the position of the sun matters most on a clear day. But shooting in the middle of the day is possible if the weather is overcast.

Sunny California vs. Overcast Portland. And yes, my hair really was that color once upon a time!
This is because the clouds diffuse the light and make it softer, less direct (which, incidentally, is exactly what a diffuser attachment will do for your flash). Overcast days are usually also more humid and this helps the colors pop out even more.

Diffusion's not just for clouds! The trees can produce dappled light, a nice compromise between full sun and dark shade.
Something to consider if you do have to shoot on sunny days, or even if you’re just looking to make some amazing landscape photographs, is a polarizing filter. This is something that attaches to your lens and helps reduce the light contrast between sky and land. It also cuts down on reflections and brings out the color in and underneath reflective surfaces, such as water or glass. You usually use them on SLR cameras with interchangeable lenses, but they do have some options out there for point and shoot cameras now too. So now you have no excuse.

It even works on storefront windows! Neat!
Color temperature
Daylight is generally a white or blue, except as the sun nears the horizon (remember, it gets redder at sunrise and sunset). As luck would have it, camera flashes also tend to be daylight range. But studio lights, candles, and most lamps in your house are going to give off much redder light than daylight or flash. Mixing color temperatures by using different light sources could either look really artistic or really horrible. If you’ve ever tried to take flash pictures indoors you probably know what I’m talking about.

It's How I Met Your Mother all over again!
Some people prefer natural light and some like the finer control of artificial light. There are all sorts of filters you can get to make your lights and flashes redder or bluer or softer or harsher, so all that matters nowadays is how you use the light and how much of it you have.
Angle of light
This is a biggie. Remember the shadowy eyesocket problem? That’s just one example of many where the angle of light is not ideal for the subject. If you’ve ever flipped through a magazine you’ve probably noticed that most model pictures are shot with light coming in from the side. This is because side light rocks and makes objects look amazing by enhancing the natural contours. If you took that same model and shot him or her with a straight-on flash, that face would lose all natural contour shadows and basically flatten out. Not to mention the possibility of red eye. Nobody wants that in the modeling world. (Then again, Halloween…)

Flash in the face vs. flash from the side. Which looks more natural?
Unless you’re going for a really dramatic shot, just using side light and nothing else may not work for you. You might need some light on the other side to balance it out and make the face look more normal. Sometimes you have enough ambient light, as I did in this next picture thanks to the streetlights.

We were talking about models?
And sometimes you need to help it out. You can use additional lights… or you can reflect the light you have. Film and photography professionals use white boards to do this, but just about any surface can do it.

Like, say, your own subject's hand.
The best thing you can do if you want to use flash is to get an external one that sits on top of your camera. You can angle external flashes independently of the camera itself, which means you can bounce the light off of walls or the ceiling and get some nice, indirect light on your subject. If your camera comes with a flash shoe you can do this. Even better is to get a remotely triggered flash, which doesn’t even require the flash to be attached to the camera! But not all SLRs can manage this yet.

The angle of light can throw shadows, influencing your picture. From left to right: bounced overhead, bounced high on nearest wall, bounced low on nearest wall.
Most point and click cameras have a major disadvantage when it comes to light angle, and that’s the flash. It’s stuck there in straight-on mode! But do not despair, because there are options here too. You can get diffusers for point and shoots that will soften the light, and you can use bounce cards to angle the light. Check out this video for a DIY solution that’s easy and cheap!

I got this picture simply by bouncing the flash off the ceiling. I don't even want to imagine what it would have looked like straight-on.
There’s so much more I can tell you about light, but let’s move on for now to:
